Traveling with kids

North to Alaska Roadtrip: One Day in Yellowstone National Park

//

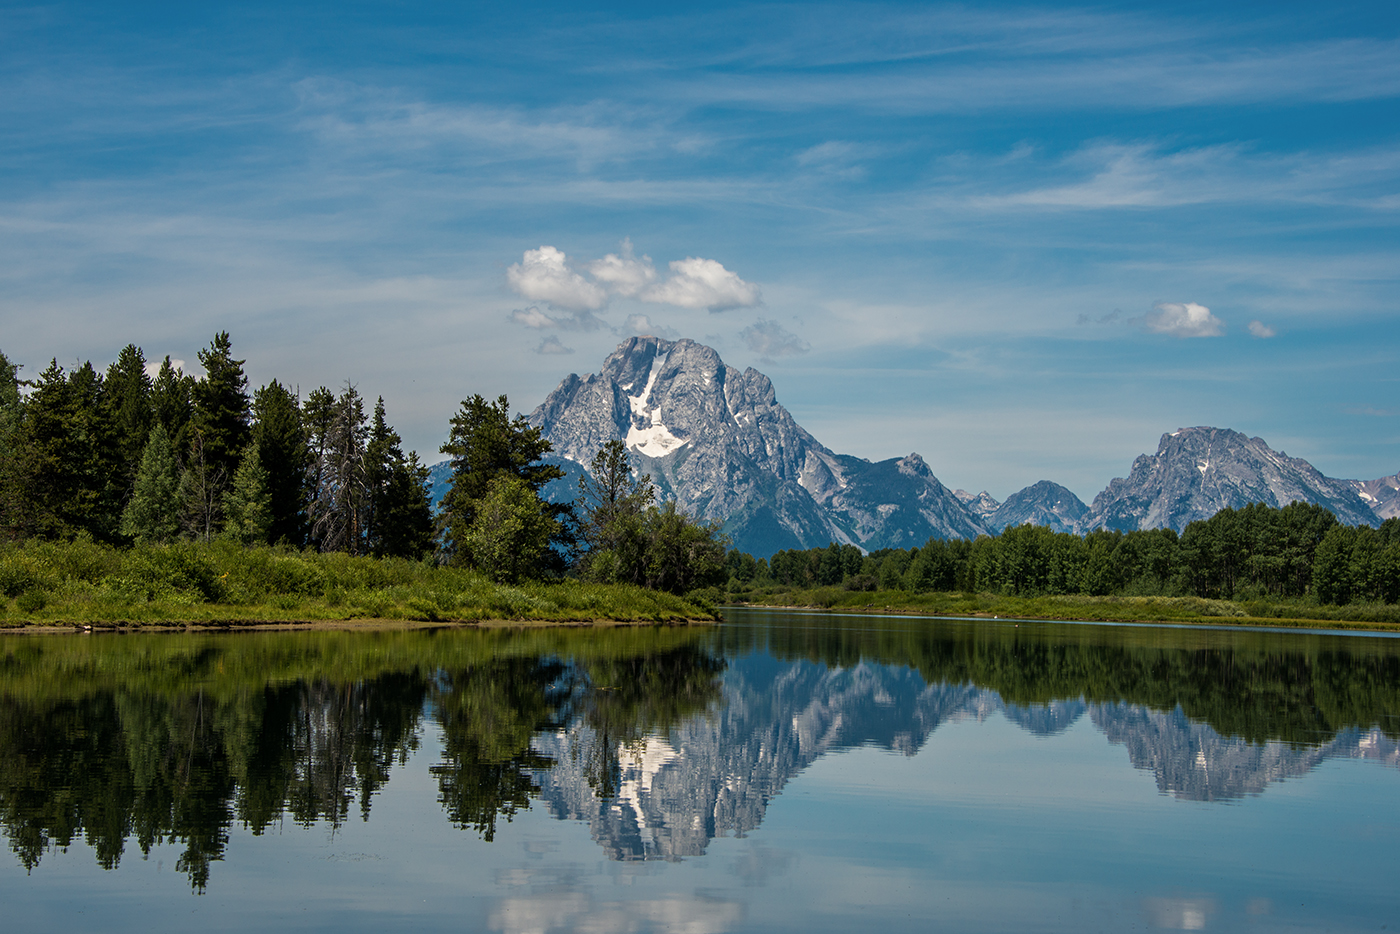
Yellowstone is one of those places I’d heard about my entire life but really had no idea what to expect. I did know that it is most certainly not a park to visit in one day! It truly deserves days and probably multiple visits to really experience it correctly. However, we knew going into this trip we’d have to make do with our brief stay and luckily, picking the top places we’d see was fairly easy. First, we had to stop at the most famous geyser in the world, Old Faithful, and then, we’d swing by the other-worldly and technicolor Grand Prismatic Spring. 

We drove up from Jackson Hole via the scenic route on US-191, giving us more of the park to see. As we were there in July, the traffic definitely wasn’t ideal. However, the slowness allowed us more time to look out the window. After a quick picnic lunch, we went to the geyser area. 

Highway to Yellowstone

I have to admit that I had no idea that Yellowstone contains the majority of the world’s geysers and the largest concentration in one area! In the Old Faithful area alone, there are multiple geysers to view. Prior to the eruption, we checked out the Old Faithful Inn, the Visitor Center, some of the other geysers and grabbed some ice cream to eat on the boardwalk. Sure, it was all a bit touristy, but also one of those things everyone should probably experience once!


Geothermal pools and springs along the boardwalk

Good Old Faithful


Old Faithful Erupting

After visiting the Upper Geyser Basin, we continued along the road to our next stop, the Grand Prismatic Spring. I had seen photos of this on Instagram and it looked incredible. The parking area was full, so we parked along the road. Although I would’ve preferred to do the Fairy Falls Trail hike that overlooks this area, my children weren’t feeling up for it. Instead, we simply hiked straight to it from the road, which is a dead easy walk over a bridge and to a boardwalk. I carried our littlest one in the Ergo because I was worried he might be tempted to dive into the steamy, colorful pools. Despite not getting the best photo op from above, I’m so glad we saw it. It’s such an incredible wonder of the world!

180360_Yellowstone_FireholeRiver

180360_Yellowstone_River

180360_Yellowstone_GP

180360_Yellowstone_ExcelsiorGeyser2

180360_Yellowstone_ExcelsiorGeyser3

180360_Yellowstone_GPLines

180360_Yellowstone_GrandPrismatic_2

180360_Yellowstone_GrandPrismatic1

180360_Yellowstone_GrandPrismatic_6

180360_Yellowstone_GrandPrismaticKids

180360_Yellowstone_GrandPrismatic_Tourist

Finally, we got back in the car and headed to our hotel in West Yellowstone. This was one of the places that was well-booked in advance, so we didn’t have many options. The Days Inn hotel was our least favorite on the trip, but it wasn’t that big of a deal. Honestly, nothing looked too spectacular in this small town. We walked down for a casual pizza dinner at the Wild West Pizzeria, came outside to a beautiful double rainbow and then called it a night.


Definitely not taking anything from this hotel. HA!
 

Up next– Day 4: Yellowstone to Glacier National Park

North to Alaska: Salt Lake City to the Grand Tetons

///

On our way out of Salt Lake City, we figured we should visit at least one site in Utah. Even though we’ve been to the Great Salk Lake before, I’m kind of fascinated by endorheic basins, so we quickly stopped at the Saltair to see if anything had changed since we were last there. It is so perfectly creepy! (I wish I could go back in time and see it when it was a full-fledged resort.) From there, we drove towards Logan, so we could take Highway 89 through Idaho and into Wyoming. I must admit, it’s pretty cool to drive through 3 states in a matter of a couple of hours!

Honestly, I wasn’t originally planning to stop in the Grand Tetons, but my friend Desi told me that it would be a mistake to miss it. As it wasn’t out of the way, I decided to add it to the itinerary and I was so glad that I did! It turned out to be absolutely beautiful and a place I’d really love to return to. We stayed the night in a cabin at the Cowboy Village Resort  and for dinner, we walked down to Wyoming’s oldest brewery, Snake River Brewing Company. It was the perfect place to take children that had been cooped up in a car for hours.

The following morning, we visited Jenny Lake, the Mormon Row Historic District and a few different overlooks on the way to Yellowstone. 

180360_GrandTeton_Road

Scenic Drive

The Teton Range

180360_GrandTeton_MormonRow

Mormon Row Historic District

180360_GrandTeton_JennyLake

Jenny Lake

Snake River Overlook

Oxbow Bend Overlook

Reflections

Up next — Day 3: Grand Teton to Yellowstone National Park

The Car Cruise

//

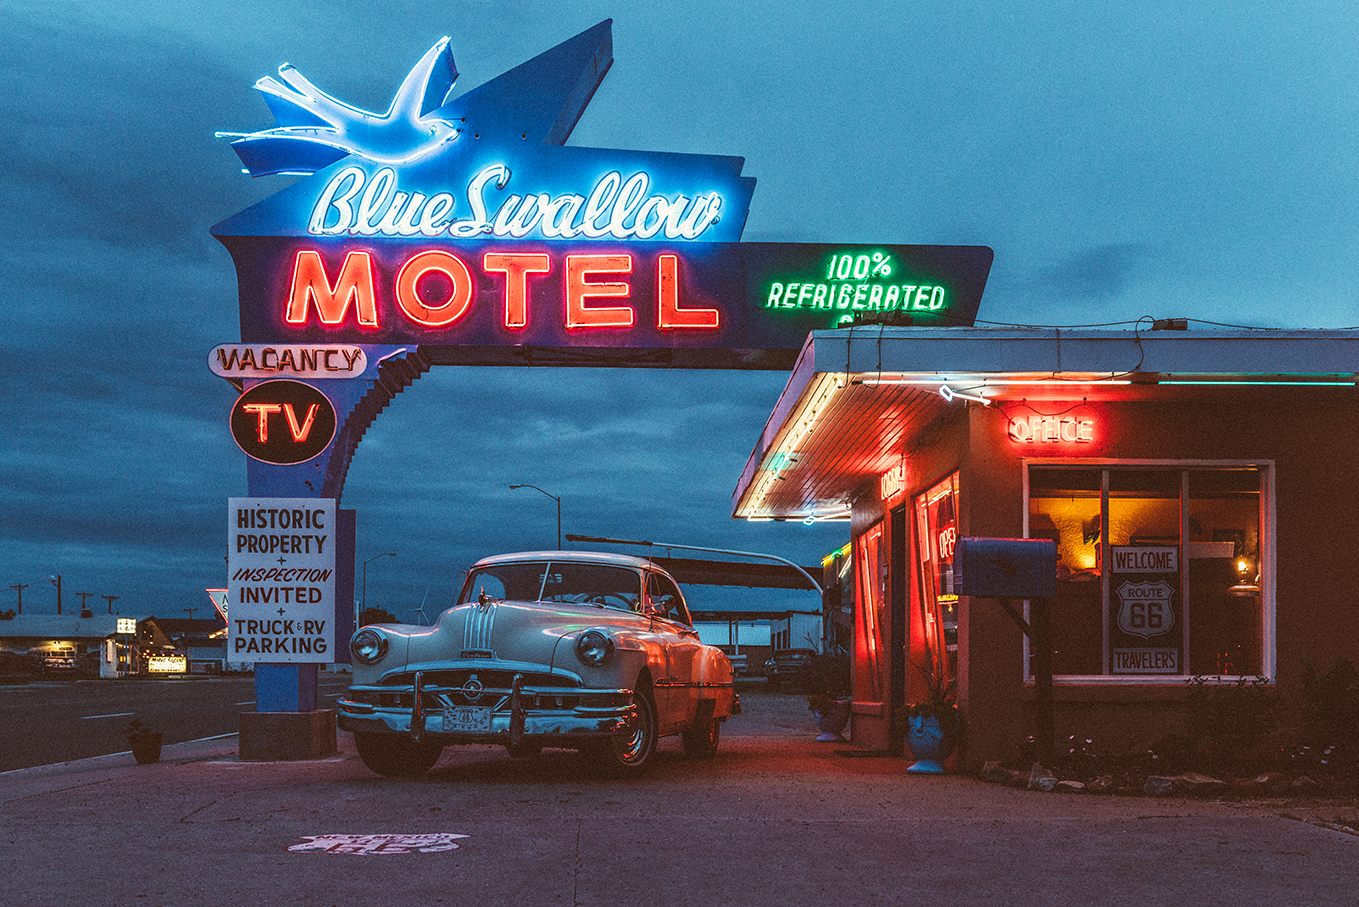
With summer nearly approaching and endless travel possibilities on the horizon, I wanted to share something we’ve been doing lately that I’ve dubbed as: ‘The Car Cruise.’ Much like an actual cruise, it’s a road trip that covers a lot of ground in a short amount of time. Whether there’s a lack of finances, time or both — it’s a fun, quick way to travel. We’ve taken many of these road trips over the past several years, so I thought might be helpful to share some of our experiences and travel tips.

Honestly, I’d love to be able to take months off at a time and tour the world slowly, but so far that’s not been an option for us. All of our recent road trips have had time limits and tight budgets! But, because I’m determined to see as much of the world as I can — I’ve learned to make it work. These constraints have forced me to focus on seeing as much as possible with the least amount of time. And just like cruising on water, this condensed method allows for a “taste” of each place; which at the very least, creates a visual image and a ‘feeling’ for areas that you may want to revisit. But unlike a cruise ship, it can be completely tailored to meet each traveler’s specific needs. 

All it takes is some solid research and an adventurous spirit. Besides, planning for travel is half of the fun, right?!

Here’s how it’s done:

  • First, decide your starting and ending points, then find what is interesting in between. I like to come up with a title that encompasses what we’re doing, ie. “North to Alaska,” “The American Southwest,” “Andiamo- 7 days in Italy” and then go from there.
  • Consider how many hours a day you are willing to drive. Since most of my road trips have been just me and 3 kids, I found that 6 hours max in the car is what they can handle right now. Some days we only drove 3 and others we pushed to 10. The latter were not fun at all, but sometimes you just have to power through! Really pay attention to mileage and timing, as well as factoring in stops for food, bathroom breaks, fueling up, or in my case — photo ops!
  • Next, figure out where to stay. I look everywhere from AirBNB to Expedia to TripAdvisor to blogs to friends and even Instagram! Book ASAP, as the best places always fill up early. On some of these trips, sometimes the accommodations are roadside motels that you’d normally never consider. Remember, it’s part of the charm! 
  • Hone in on one or two must-see places for each stop (these might be what the area is famous for) and then seek out something unique or out of the ordinary to do. I almost always run a search for unusual, bizarre, or local secrets to try to discover “the other side.” HA! If traveling with children, always find an activity or place that they will enjoy visiting, too. And if all else fails, take them to a local park. It’s interesting to see how different they can be from place to place.
  • We try to eat local and avoid chains whenever possible, so scour the internet for the best restaurants in each stop.  I wish I could say I’m a “fly-by-the-seat-of-my-pants” kind of eater, but I can finally admit that I like knowing where to go in advance. There’s nothing worse than rolling into town after a long, tiring day, with 3 whiny, starving children (and possibly husband) and then having to sift through Yelp or Zagat in the car or hotel room. Instead, I make a list of any and all restaurants that keep popping up during my research phase. I love to search for “Travel Guide __(wherever I’m going)__” and see what pops up. Generally there are travel magazine articles, as well as personal bloggers that post these. Between the two, I usually find a decent list of recommendations to get me started. Then I do my own research to see what suits our family best. I use this method for shops and sights as well.
  • Make an itinerary. I’m fairly organized in an old-school way in that I still print everything out and put it in an envelope that I travel with. I always have a basic plan written down of what I want to see or do each day. The list always includes restaurant options, shops to visit, things I might want to buy, and perhaps most importantly — phone numbers, contact info, reservation numbers, etc. If for some reason there’s no cell service or I’ve lost my phone, I can still access things the old-fashioned way.
  • Along those same lines, print or buy PAPER maps. Yes, it’s possible that they might be completely unnecessary — but trust me when I say, as someone that has been stranded with a non-functioning Sat-Nav in the middle of nowhere with no cell-reception and not another car in sight, they just might come in handy.
  • To help save money and morning stress, we always plan to make our own breakfasts and sometimes even lunches. We fill a large bin (or reusable grocery bags) with an electric kettle, coffee with a pour over filter, tea, sugar, reusable mugs, bowls, silverware, dish soap, granola, oatmeal packets, cereals, protein bars, dried fruit + nuts, chips, crackers, bread and peanut butter and jelly. I also like to pack an emergency provisions bin with water, wine – HAHA, toilet paper, wet wipes, plus a roadside emergency kit just in case. 
  • And finally, this is probably my biggest tip of all: you can always go back. If for some reason it becomes impossible to see and do everything planned, never fear. It just means that you’re meant to return! 

Up next, I’ll be sharing some of our “Car Cruise” road trips with you….

Travel Guide: Turks and Caicos

///

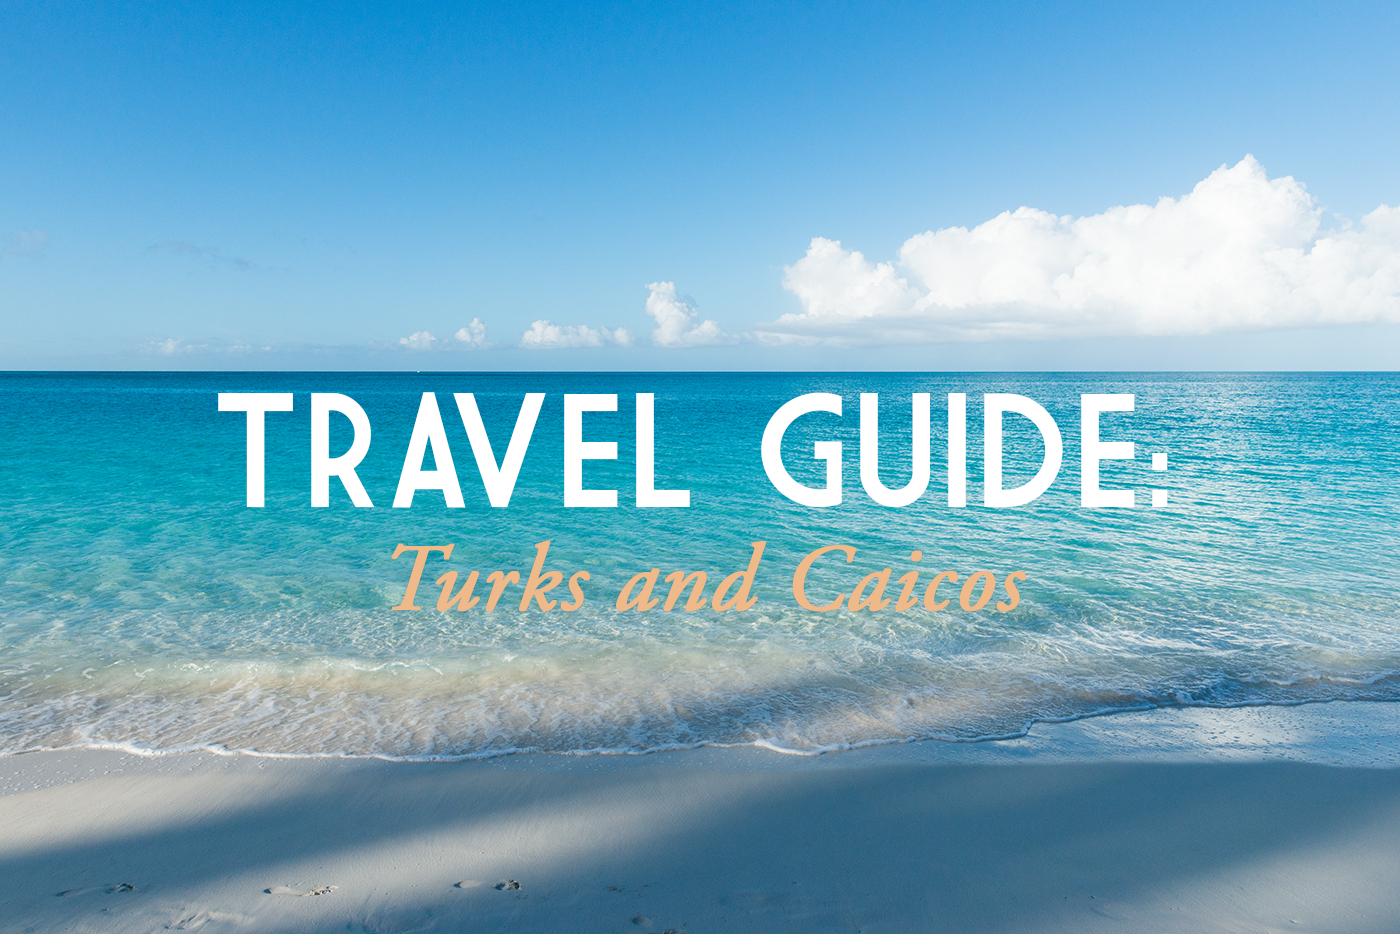
The Turks + Caicos are a group of islands located in the West Indies. About an hour flight from Miami, this British Overseas Territory is home to one of the most beautiful beaches in the world — Grace Bay. With its baby-soft white sand, crystal clear turquoise water and gentle waves — it’s hard to imagine a more idyllic beach could exist!

Turks and Caicos Travel GuideTurks and Caicos Travel Guide

We spent 9 days visiting the most populated island of Providenciales in January 2016. Although I’d hoped to island hop, it was too complicated and expensive for our family of 5. Instead, we kept it simple and explored nearly every inch of “Provo.” Prior to leaving, I studied the island in depth and it seemed that Grace Bay was the most popular area to stay. After visiting, I would have to agree! We rented a condo there, only a block away from the beach. Every morning we would bike or walk over for a swim and then each afternoon we would drive to a different area of the island.

Turks and Caicos Travel Guide
Our first excursion took us to the Northwest Point. The freeway eventually turns into a sandy, one-lane road that ends at the beach. The area was completely deserted but covered in large conch shells, which Max and I enjoyed picking up.

Turks and Caicos Travel Guide
Turks and Caicos Travel GuideTurks and Caicos Travel Guide

From there, we followed the coast back as far as we could, enjoying some of the more local scenes on the island. We also stopped at the infamous da Conch Shack and Rum Bar. The service was lousy but it was a fun place to grab an afternoon drink.

Turks and Caicos Travel GuideTurks and Caicos Travel Guide

The next day, we took a boat (through Caribbean Cruising) from Leeward Marina to the iguana inhabited island of Little Water Cay. Never have I seen so many iguanas in one place! There’s a small visitor’s center with a few guides, but mostly we had the island to ourselves. We didn’t take a guided tour, but instead followed the boardwalks through the jungle and explored some of the private beaches on our own.

Turks and Caicos Travel GuideTurks and Caicos Travel GuideTurks and Caicos Travel Guide

Another fun and educational outing was the Caicos Conch Farm. Although nearly every restaurant in Provo has some form of conch on the menu, I really had no idea what was in a conch shell until visiting this non-profit farm. The tour begins with a biology lesson about the conch (which is actually an edible sea snail), followed by a walk around their hatcheries. The educators explain and show all of the different stages of a conch’s life cycle, what they eat and how they reproduce. They also talk about how some species are endangered and how they are being over-harvested.

Turks and Caicos Travel Guide

Turks and Caicos Conch Farm

Turks and Caicos Conch Farm

Turks and Caicos Conch FarmTurks and Caicos Conch
Turks and Caicos Conch Farm

The rest of the time, we drove around to visit different beaches. On the south side of the island we discovered Chalk Sound, with hundreds of rock islands in a shallow, turquoise lagoon. It wasn’t particularly accessible but was interesting to look at.

Turks and Caicos Travel Guide

Next we stopped for a swim at Sapodilla Bay and Beach, which we found to be a great area for children.

Turks and Caicos Travel Guide

On one of our last days, we drove to Malcolm’s Road Beach. The road was a bit rough but our tiny, Fiat-like car managed. The beach was a little different than the others, with golden sand and a large reef. 

Turks and Caicos Malcolm Beach

Turks and Caicos Malcolm Beach
Lastly, a few more images from stunning Grace Bay.

Turks and Caicos Grace Bay Travel Guide
Turks and Caicos Travel Guide
Turks and Caicos Travel Guide Pier

TIPS + SUGGESTIONS

STAY: Grace Bay, hands down. There’s a stretch of hotels all along the beach and plenty of rental properties to choose from. Restaurants, bars, shops and the ocean are all mostly in walking or biking distance. The only other options I would recommend would be staying at the luxury resort of Amanyara (but it is very secluded and on the opposite side of the island) or find a house rental near Sapodilla or Taylor Bay (if you are looking to be far away from touristy areas.)

TRANSPORTATION: We rented a car (which I would recommend if you want to see the island), however the rental process was a nightmare. We had to wait around for an hour and half because they didn’t have a car available (despite having booked months in advance) and we barely fit in the car they gave us. If you really want to relax and stay situated in Grace Bay, you could certainly get by without a car.

EAT: I can’t say we had any truly outstanding meals while we were in the Turks and Caicos, but we had plenty that were good enough. We stocked up on groceries at the Graceway Gourmet store in Grace Bay which allowed us to eat breakfast and/or lunch at our condo. We also went to the local grocery in the middle of the island just to check it out. It was definitely cheaper but didn’t have the selection of organic and natural items that I wanted. Most evenings we would go out for an early dinner. Some of the places we tried were: Lupo, Bella Luna, Chopsticks, Da Conch Shack, Garam Masala, Flamingo Cafe, Somewhere, and Lemon2Go.

DO: Grace Bay Beach, Caicos Conch Farm, Iguana Island in Little Water Cay (bring insect repellant – the mosquitoes were thick in the jungle), visit the other islands in Turks & Caicos, snorkel in the reefs. Some things we didn’t get to do but that looked fun were parasailing, kayaking through the mangroves and riding on the Provo Ponies.

BRING: Insect repellant. I had read that no-seeums were a bit of a problem on the beach and while we did get bit here and there, it wasn’t too bad. Money! It’s quite an expensive island to visit. Since everything has to be shipped in, you’ll find that a 6 pack of beer runs nearly $20 and regular milk was over $8/gallon. Eating out was even pricier!

Turks and Caicos Travel GuideTurks and Caicos Travel Guide

Turks and Caicos Travel Guide // 180360.com

Cambridge Day Trip: Waddesdon Manor

///

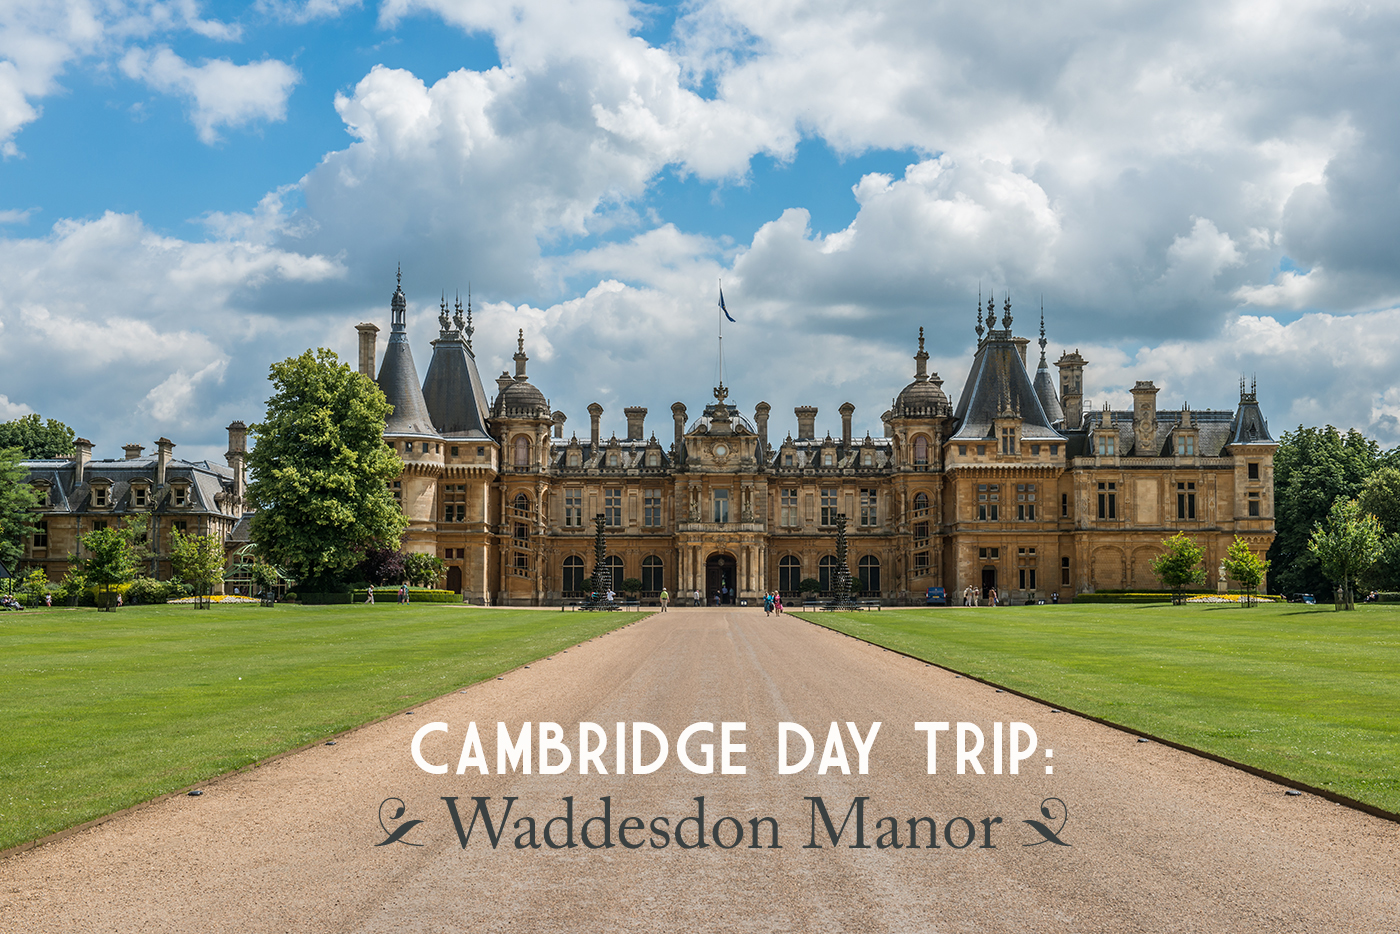
Perhaps I’ve watched too much Downton Abbey — but lately, I’ve found myself wanting to experience England in a more traditional sense. I suppose because we’re always there to see family, our visits are often centered around just that. Instead, I’ve been envisioning a trip that involves a stately home, roaming the beautiful countryside via horseback, adorned in proper attire, followed by afternoon tea with scones (pronounced: scons) slathered with an obscene amount of clotted cream and a touch of jam. There’s a hunting dog curled up by my feet and to my side is a pile of books that I’ll read by a fire, once I’ve finished stuffing my gob… I guess what I’m trying to say is, it’s time we do a few touristy things too!

Cambridge England Day Trip

This past summer we decided to brave the nightmare, errr… I mean nuisance of driving in England and a find a stunning estate where I could pretend to be Lady Mary. My father in-law (who is always up for anything) recommended Waddesdon Manor — a gorgeous, country house in Buckinghamshire, about an hour and half drive from Cambridge.

Cambridge England Day Trip to Waddesdon Manor

This Renaissance-style manor was built for Baron Ferdinand de Rothschild in the 1870’s. Essentially a French chateau in the middle of the English countryside, it’s much like those found in the Loire Valley. It’s surrounded by various gardens, wooded forests, an aviary, a dairy, playground, stables, summer houses and much more. Inside, Waddesdon Manor is an impressive home made for entertaining guests; with ornate rooms, wine cellars containing 15,000 bottles of historic wine and a vast collection of antiques, art and treasures.  

Cambridge England Day Trip to Waddesdon Manor

The floors are adorned with the reddest carpet and the walls are covered with English and Dutch masterpieces.

Cambridge England Day Trip to Waddesdon Manor

The drawing rooms are all richly decorated.

Cambridge England Day Trip to Waddesdon Manor

 An austere dining table in the wine cellar is juxtaposed with an extravagantly dressed table on the main floor.

Cambridge England Day Trip to Waddesdon Manor // 180360.com

There are separate areas in the house for men and women. Above are some of the weapons displayed in the armory of the Bachelor’s Wing.

Cambridge England Day Trip to Waddesdon Manor // 180360.com

Downstairs, there’s an unusual, musical elephant automaton

Cambridge England Day Trip to Waddesdon Manor // 180360.com

A grand staircase and billiard room.

Cambridge England Day Trip to Waddesdon Manor // 180360.com

One of the small rooms off a bedroom. Perhaps this is where I shall take my tea and scones?

Cambridge England Day Trip to Waddesdon Manor // 180360.com

A lady’s bed and (wooden) loo. I’ll pass on reading by that fireplace, though!

Cambridge England Day Trip to Waddesdon Manor // 180360.com

 Back outside, there are parterre gardens and fountains with views of the countryside.

Cambridge England Day Trip to Waddesdon Manor // 180360.com

Cambridge England Day Trip to Waddesdon Manor // 180360.comCambridge England Day Trip to Waddesdon Manor // 180360.com

The aviary.

Cambridge England Day Trip to Waddesdon Manor // 180360.com

The children enjoyed the walk through the wooded forest towards the playground areas and stables. Be sure to find all of the hidden play areas. 

Cambridge England Day Trip to Waddesdon Manor // 180360.com

While I didn’t exactly live up my original fantasy, visiting Waddesdon Manor was definitely an afternoon well-spent. It was so interesting to see firsthand how the noble families lived. This just means that next year I’ll find have to find a horse, some riding apparel and an endless, green countryside… 


DETAILS//TIPS

Waddesdon Manor
Aylesbury, Buckinghamshire
England, HP18 0JH
Tel: 01296 820414

  • Driving is not permitted on the property. However, they provide a shuttle bus or there’s a footpath, if you’d prefer to walk in.
  • Expect to visit for at least 2-3 hours. 
  • Tickets for visiting the house are twice as much and have a timed entry, but include visiting the grounds. 
  • Although we did not eat on our visit, there are several different places to purchase food and drink, if needed.
  • If you’re traveling with children, be sure to seek out all of the playground areas including a giant slide and zipline.
  • Prams/strollers are not allowed inside the house.

Cambridge England Day Trip to Waddesdon Manor // 180360.com

American Southwest: Horseshoe Bend

/

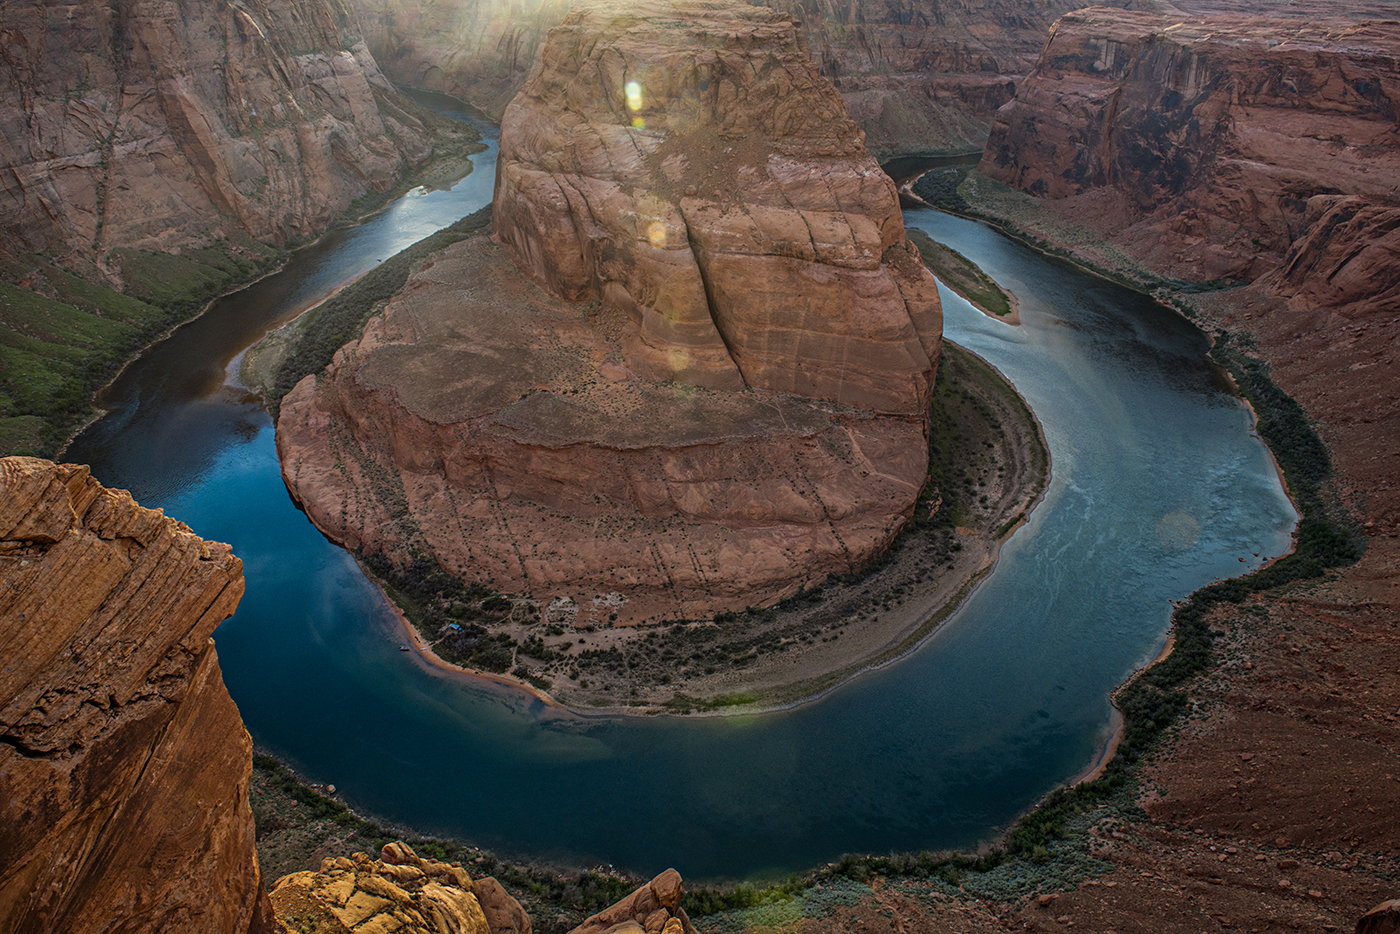
I was walking through the mall a few weeks ago and stumbled upon a kiosk of large scale photographic prints. The first image that caught my eye was one of Horseshoe Bend. It’s one of those places that seem completely iconic but also strangely under the radar. I’d only learned of it a year or so ago, and quickly noted I had to see it the next time I was in Arizona. Seeing that photo at the mall, reminded me to share the photos from our visit…

For those who don’t know, Horseshoe Bend is a small, looped section of the Colorado River just outside of Page, Arizona. I had planned to shoot Antelope Canyon the next day and thought I’d try to squeeze in a quick viewing as soon as we arrived. Unfortunately, we’d gotten on the road a little later than I’d hoped, so we quickly checked into the hotel, left my husband and baby behind to take a nap and the bigger kids and I rushed off to catch the bend before the sun set. I hadn’t really done my research and ended up taking the wrong road, so we were truly racing the sun to make it in time. If there’s one thing I know for certain, my children will always remember the crazy adventures I take them on, especially those involving chasing light!

Once I’d found my way and pulled off at the right mile post, I was a little surprised to see nothing at all. I’d expected to see the river from the road! Instead, there’s a large parking lot, loads of other tourists and a trail leading into the desert. I prodded my children up and down the easy path, watching the sun vanish a little more every second. The funny thing is, it looks like nothing at all — just an expanse of desert. But eventually the trail stops and you see loads of people standing on the edge of rock looking down at a massive drop. And there it is. This incredible horseshoe-shaped loop of river, green grasses, orange rock, and a teeny, tiny, little campsite set up on the island. It’s kind of scary, jaw dropping and exhilarating all at the same time.

Looking back, I was wholly unprepared in more ways than one. Besides needing better directions and not arriving so late, I should’ve brought a wider lens to get everything in. I wanted to pull back further to get rid of that rock at the bottom but simply couldn’t. I also should’ve had my husband come with me to help with the children. It can be quite windy and there are no safety measures in place. In order to take photos, I had to force the kids to sit about 20 feet back so I could stop worrying about them careening to their death. It’s a long way down! But other than that, it’s a spectacular sight and definitely worth visiting if you are in the area.

Horseshoe Bend is located near Page, AZ, off of US Highway 89 between milepost 544 and 545. Park in the lot off of the highway and follow the easy trail until it ends. Arrive well before the sun sets! It takes about 10-15 minutes to walk there and then of course you’ll want time to take photos. 

180360_HorseshoeBend_ColoradoRiver 180360_HorseshoeBend_Sunset 180360_HorseshoeBend_LookingOver 180360_HorseshoeBend_Rock 180360_DesertbyHorseshoeBend 180360_HorseshoeBend_AZ